Monday, September 13, 2010

Now See the Moon in 3D using Google Moon


Nasa Moon Landing imageI was just stumbling around and saw a page where it says “See the Moon in 3D” I was curios whetherGoogle has launched new product. Yes I was correct.Google has introduced new feature in Google Earths’ new version Version 5. 0. Not only that you can view moon in 3D but also checkout the exact
 land site marked with Placemarks with the details of the different Apollo missions. I just clicked on Apollo 14 to checkout more. It gives a summary of the mission. Including date of launch, name of the landing site etc which you can checkout below.  You can find 20 such Placemarks where Apollo 14 mission landed. You can find Placemarks in each Apollo missions. Google teamed up with scientists at the NASA Ames Research Center to prepare the collection of lunar maps and charts. You can explore all the Apollo missions to landed on Moon


Apollo 14 Launched: 31 January 1971
Landed on Moon: 5 February 1971
Landing Site: Fra Mauro
Returned to Earth: 9 February 1971
Crew: Alan Shepard, commander Stuart Roosa, command module pilot Edgar Mitchell, lunar module pilot
Google moon


With Moon in Google Earth, you can:
  • Take tours of landing sites, narrated by Apollo astronauts
  • View 3D models of landed spacecraft
  • Zoom into 360-degree photos to see astronauts’ footprints
  • Watch rare TV footage of the Apollo missions

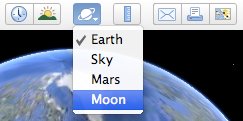
How do I watch Moon on 3D using Google Earth?

google earth moon toolbar option
If I’ve missed anything or if you’ve found some more interesting options to explore Apollo Moon Mission by Nasa, please let others know by commenting below.

 For Latest tech news,softwares,updates,mobile softwares visit www.Digitsdiary.blogspot.com

Track Any Satellite Location At Real Time


satellite with earth globe
Are you a researcher or a student trying to learn more about satellite or track the movements or satellite? Then I have a good resource for you to track any satellite at real time and learn more abouts its launch mission, astronauts, launching location, Country and more. According to Wikipedia Currently there are approximately 2465 (outdated) artificial satellites orbiting the Earth. N2YO is such a such which lets you track any artificial satellite at real time. Although you can’t track the images from any of the satellites, you can view the current physical location of the satellite based on altitude. The top tracked satellites are: ISS (ZARYA), OTV 1 (USA 212), GOES 12, HST, NOAA 15, GOES 11, ASTRA 3B, GALAXY 15, HELIOS-2A, PROGRESS M-05M, and BEIDOU G3. And the latest launched are BEIDOU G3, SERVIS 2, NAVSTAR 65 (USA 213), COMSATBW-2, ASTRA 3B, PROGRESS M-05M, COSMOS 2463, SES 1, OTV 1 (USA 212), COSMOS 2462 and CRYOSAT 2.


They collect data from space surveillance software provided by Space Track, a partial catalog of observations collected by the US Space Surveillance Network, operated by US Air Force Space Command (AFSPC). Users can specify their own location in order to have a better tracking experience. Registration is required to customize locations. Otherwise default locations are assumed based on the user’s IP address.
Users can search their satellite database based on either by SPACE COMMAND ID, by SATELLITE NAME, by LAUNCH DATE or by INT’L DESIGNATOR.

(SPACE COMMAND ID – is a sequential 5-digit number assigned by USSPACECOM to all Earth orbiting satellites in order of identification.)
(INT’L DESIGNATOR – The International designator is an internationally agreed-upon naming convention for satellites.)
You can also find Satellites based on Categories here Currently they have tracking data of around 16181 Satellite and still more to come. Users can even track debris and rocket bodies. you can catch all the latest satellite related news in their home page.


                        For Latest tech news,softwares,updates,mobile softwares visit www.Digitsdiary.blogspot.com

How To: Connect Multiple Computers From A Single Internet Connection

lan How To: Connect Multiple Computers From A Single Internet Connection
Many a times it happens so that we have more than onecomputer or laptop, in our home, however it is not in the benefit of the user to take multiple internet connection for each of the computer. So we would require to share the sameinternet connection with n no of computers. It might be a very easy problem to solve for a technical problem. However I have worked for one of the topmost software company, in which users of its operating system would used to come to solve their problems which are much easier than this. Trust me, I had even helped person who was unable to create a desktop shortcut for IE on his computer.
THERE COULD BE TWO WAYS OF MAKING CONNECTION OR LAN BETWEEN TWO COMPUTERS, EITHER WIRED OR WIRELESS.

How Do I Set Up Wired LAN Between Two Computers And Share Internet Connection?

Setting up a wired LAN connection is the simplest of all. However to do this you would need to purchase a Switch. (A switch is a device which actually splits the internet bandwidth among all the connected Switch How To: Connect Multiple Computers From A Single Internet Connectioncomputers in LAN intelligently.) What you just need to do is that you need to purchase some LAN cables with the RJ-45m rj 45 How To: Connect Multiple Computers From A Single Internet Connection jacks fitted in it . Now there would be an input port in the switch in which you need to connect the out coming RJ-45 jack of the modem or router. And in the other pins connect the jacks to the LAN port of your different computers. Your own LAN is ready now, and you can browse internet from any of your computer.

How Do I Set Up A Wireless LAN Network And Share Internet Connection?

108m Wireless Router How To: Connect Multiple Computers From A Single Internet Connection
To set up a wireless LAN network you will require a wireless router. Now after you purchase the wireless router you will need to connect the RJ-45 jack to the input port of the wireless router. Now you need to go to the control panel of the wireless router by entering the gateway address of the router in the address bar of thebrowser you are using. It will be now asking for your router user name and password. Enter the user name and password as admin and admin respectively unless you have changed it. In case it doesn’t take that refer to the router manual. You can always find your manual online.
Once you enter the control panel you may get options to turn on the wireless network. Turn it on, now it would be broadcasting the signal and is available for the laptop to pick it up.
Now go to control panel and click on “Network And Internet”. Then click on connect to a network form your laptop and it will show you the signal of your just set up router. Click on the signal which is yours and continue the steps as mentioned from each of your laptop and the wireless LAN would be setup.


                        For Latest tech news,softwares,updates,mobile softwares visit www.Digitsdiary.blogspot.com

Sunday, September 12, 2010

Check Your Mobile -Software / IMEI / SimLock Unlock code

Want to know what version of Software you have? Also check IMEI number?

Here you have the special secret codes for your mobile phone.
With these secret codes you can, (without any
 problem), check the IMEI software version, reset to default language or deactivate simlock (only on some models). Some of the codes you see below must by typed without the SIM card in the cellphone and some with the SIM card in the phone. Please be careful! - with some of these codes you may block your cellphone.

SIMLOCK Information:
Hagenuk
IMEI number: * # 0 6 #
Software version: # # 9 1 4 0 * 8 3 # 7 5 * 2 #
Mitsubishi
View IMEI:> * # 06 # View IMEI

Default language English: * # 0044 # English

JDefault language Deutch: * # 0049 # Deutsch

NetMonitor1 activate: hold * enter 4329

NetMonitor2 activate: hold * enter 621342

Enter into M4 Test mode: hold * enter 5472

Show SW version: hold * enter 5806

Show HW version: hold * enter 5807

Show SW and HW version: hold * enter 936505

NS Lock Menu: hold * enter 476989

CP Lock Menu: hold * enter 482896

NS Lock Menu: hold * enter 574243

SP Lock Menu: hold * enter 967678

IMSI Lock Menu: hold * enter 362628

Lock net.level: hold * enter 787090

Lock net.level: hold * enter 787292

Shut Down: hold * enter 3926
Motorola
IMEI number: * # 0 6#
Net Monitor ON: * * * 1 1 3 * 1 * [OK]
Net Monitor OFF: * * * 1 1 3 * 1 * [OK]
* - press this until box shown up
Nokia
IMEI number: * # 0 6 #
Software version: * # 0 0 0 0 # lub * # 9 9 9 9 #
Simlock info: * # 9 2 7 0 2 6 8 9 #
Enhanced Full Rate: * 3 3 7 0 # [ # 3 3 7 0 # off]
Half Rate: * 4 7 2 0 #
Provider lock status: # p w + 1 2 3 4 5 6 7 8 9 0 + 1
Network lock status: # p w + 1 2 3 4 5 6 7 8 9 0 + 2
Provider lock status: # p w + 1 2 3 4 5 6 7 8 9 0 + 3
SimCard lock status: # p w + 1 2 3 4 5 6 7 8 9 0 + 4
1234567890 - MasterCode which is generated from IMEI
Philips
IMEI number: * # 0 6 #
Simlock info: * # 8 3 7 7 #
Security code: * # 1 2 3 4 # (Fizz) or * # 7 4 8 9 #
Samsung
IMEI number: * # 0 6 #
Software version: * # 9 9 9 9 # albo * # 0 8 3 7 #
Net Monitor: * # 0 3 2 4 #
Chaning LCD contrast: * # 0 5 2 3 #
Memory info: * # 0 3 7 7 # albo * # 0 2 4 6 #
Reset memory (SIMLOCK`a removing!!!): * 2 7 6 7 * 3 8 5 5 #
Reset CUSTOM memory: * 2 7 6 7 * 2 8 7 8 #
Battery state: * # 9 9 9 8 * 2 2 8 #
Alarm beeper: * # 9 9 9 8 * 2 8 9 #
Vibra test: * # 9 9 9 8 * 8 4 2 #
Sagem
IMEI number: * # 0 6 #
Service Menu access: MENU 5 1 1 #
Siemens
IMEI number: * # 0 6 #
Software version: put off sim card and enter:: * # 0 6 # (and press LONG KEY)
Bonus screen: in phone booke: + 1 2 0 2 2 2 4 3 1 2 1
Net Monitor (S4 Power): Menu 9 8, left SoftKey, 7 6 8 4 6 6 6, Red phone, Menu 5 6
Sony
IMEI number: *#06#
Software version: *#8377466#
Show list of product creator names: (you must save this number in your Phone Book with "own phone no." record): + 1 2 0 2 2 2 4 3 1 2 1
IMEI number: * # 0 6 #
Software version: * # 0 6 #
Net Monitor: 0 0 0 0 0 0 *
Bosch
IMEI number: * # 0 6 #
Dafault Language: * # 0 0 0 0 #
Net Monitor: * # 3 2 6 2 2 5 5 * 8 3 7 8 #
Dancall
IMEI number: * # 0 6 #
Software version: * # 9 9 9 9 #
SIMcard serial number: * # 9 9 9 4 #
Information about battery status: * # 9 9 9 0 #
Selftest (only Dancall HP2731): * # 9 9 9 7 #
Show version configuration: * # 9 9 9 8 #
Net Monitor: * # 9 9 9 3 #
Ericsson
IMEI number: * # 0 6 #
Software version: > *
Dafault Language:
Enter to phone menu without SimCard - after Wrong PIN: press NO:
* * 0 4 * 0 0 0 0 * 0 0 0 0 * 0 0 0 0 #

***********************Ends*********************


                        For Latest tech news,softwares,updates,mobile softwares visit www.Digitsdiary.blogspot.com

QTTabBar v1.5.0.0 Alpha 4 to Add Tab Feature to Windows Explorer

QTTabBar is extension for Windows Explorer that brings tabbed browsing to Microsoft's file browser, along with a host of other great features. QTTabBar was developed for Windows XP and Vista users and new version also support Windows 7. In past suddenly its development was stopped by the developer but now they start it again and more function and new 7 support.

Now a new version of QTTabBar v1.5.0.0 Alpha 4 is available for download which comes with lots of new improvements and support for Windows 7 as well. QTTabBar is a great shell extension that can add tabs function and many other advanced and useful features to Windows Explorer. The extension was written by a Japanese developer known as "Quizo" and now its being updated by "Paul Accisano".Thank them for such a tiny and great free application. 


QTTabBar v1.5.0.0 Alpha 4 Features:

    * Plugins support for enhanced functionality. 
    * Now works in Windows 7 as well
    * Desktop Bar restored for XP/Vista
    * F2 rename selection functionality restored
    * "Use old ListView control" option enabled
    * "Display column headers in all views" option enabled
    * General stability improvements
    * Tabbar/Toolbar positioning now works correctly on XP
    * Search box no longer mysteriously shrinks when focused
    * Full Row Select can be enabled/disabled when the SysListView32 is used
    * Libraries can be dropped into 


Supported Operating System: WinXP, Vista, Windows 7

After you installation you can add it to Windows Explorer by going to "View- Toolbars" menu or by right-clicking on Menubar and selecting the option. You can install plugins for enhanced the functionality from right click on tab bar and goto plugins. 


Free Download QTTabBar v1.5.0.0 Alpha 4:
QTTabBar v1.5.0.0 Alpha 4.exe (Main Program, 583 KB)
QTTabBar v1.5.0.0 Alpha 4_Plugins.rar (Plugins, 90 KB)


                        For Latest tech news,softwares,updates,mobile softwares visit www.Digitsdiary.blogspot.com